
Spin Art with a Salad Spinner: A Must-Try Classroom Activity
- Andrea Wlodarczyk

- Sep 3, 2025
- 5 min read

If you try just one new art activity this year, make it Spin Art with a Salad Spinner! It’s quick, low-cost, and endlessly engaging for learners of all ages. Young students and those with exceptional needs especially love it—instant results, vibrant colors, and the thrill of motion make this project a fantastic way to engage students' sensory exploration. Teachers love it for all the boxes it checks.
Highlights Benefitting a Variety of Learners:
Kinesthetic
Fine motor skills- grasping, pinching (using an eye dropper to apply paint)
Gross motor skills- pumping, pushing (the salad spinner can take a bit of rough-housing!)
Social/Emotional- small groups (I recommend a max of 4) can watch each other practice this exercise, practice waiting for their turn, and talk about the process/outcome
Joyful Noise- the button pumping and spinning sounds excite students
Spinning- this is a simple machine that students love to watch "work"
Meaningful Color- choices can be tailored seasonally, on theme, to teach color mixing, etc.
Quick- each turn takes under 2 - 3 minutes, providing immediate gratification and allowing for many students to complete it in one session
Perfect activity for an art center or TAB-aligned classroom
Your Simple Setup:
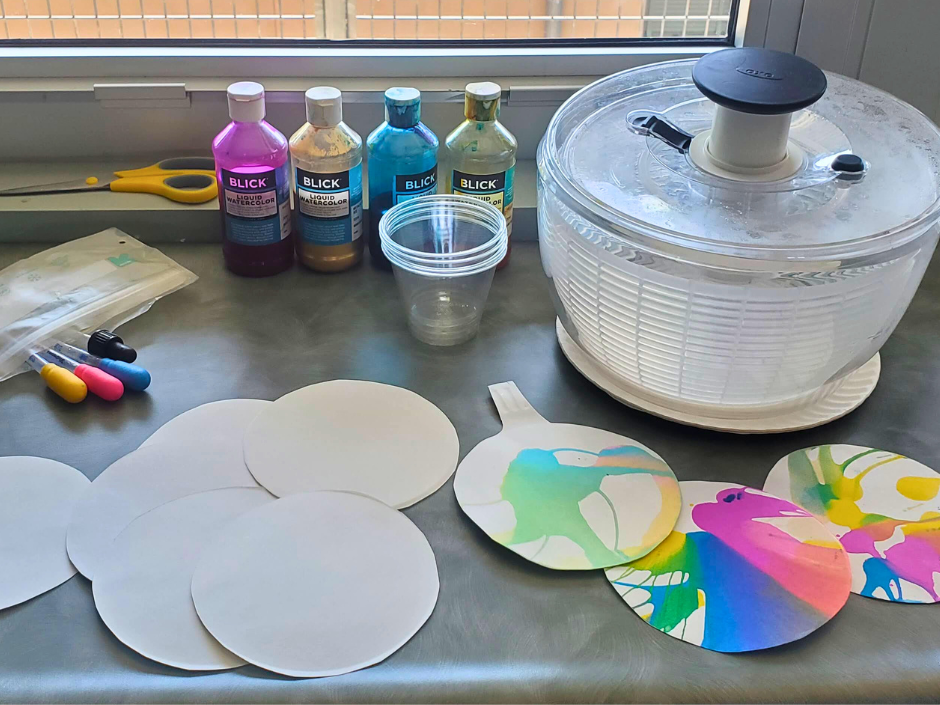
Salad spinner- Mine is the OXO brand (around $5 from the Salvation Army). A new one, on sale, is usually around $24 (as of 8/31/25) as linked here. But keep your eyes peeled in Buy Nothing Groups, FB Marketplace, and at donation stores!
Liquid Watercolor Paints- in my opinion, these are the best bang for your buck. They are vivid, can be watered down and maintain vibrancy, a little goes a long way, and they pair perfectly with eyedroppers to apply the paint. The metallics are brilliant for this activity and really shine! My favorite brand is Blick Liquid Watercolors. Watered-down tempera works in a pinch, too!
Eyedroppers- I've been fortunate enough to locate plastic bulb pipettes at my school sites (used by science teachers) so I've never bought them. Here is a similar kind- in my experience, they last for years! The type pictured above also work- they have a plastic body and rubber bulb. However, they can be challenging for small hands and are shorter than pipettes so it can be more difficult to reach into deeper paint cups.
Paint cups- My favorite are the no-spill styles with lids, like these but, you can use any kind of cup for distributing colors. I use a maximum of 4 colors because I find it produces enough variety without consuming too much time per turn.
Paper- Watercolor paper produces the most impressive results and it doesn't need to be fancy. I like this Canson paper, from Blick, but cheaper watercolor paper has served me well, too. If you look to the supply image above, I actually used white paper plates! Heavier weight drawing paper is okay- be aware that it tends to absorb the paint and may not produce as much of a "spin pattern". Cardstock and paper with a slight sheen or gloss might be exciting- give them a try!
Since time is always of the essence here's a peek into how long it takes for one turn- I seat students in groups of 4 with 4 colors max and encourage the process if they are first-timers. It's roughly 30 seconds per student if their names are already on their papers. Please excuse the movement break noise that's happening in the background :)
Seasonal Themes are Thrilling
Your choice of watercolor paint colors and paper shapes can support SO MANY seasonal themes, making this project wildly flexible and applicable all year. Some ideas to consider:

Fall: Pumpkin or leaf-shaped paper with oranges, reds, yellows, browns and a touch of greens and golds OR softer teals and greens for pumpkins leaning blue.
Talk about warm/cool colors and analogous colors, the turning of the seasons, cross-curricular connections to science/nature cycles as the days grow shorter and harvest time.
Read aloud book for an elementary connection- Spookley the Square Pumpkin. I'd chop 6x6 squares for the spinner then round the edges, like Spookley! Students can add a curly stem and leaf separately and even add a face.
Winter: Square papers (I do 6"x6" max) with blues, purples, silvers, and pearl.
Once dry, cut snowflakes, use to build snowmen or as a wintery sky
Cross curricular opportunities to talk about symmetry, SEL/uniqueness, cool colors, monochromatic colors, and value within the Elements of Art.

Spring/Summer: Get creative with interesting shapes like a flower, an apple or other organic shape, or a leaf. Offer bright floral-inspired colors.
Pattern play is fun! Get into the elements of art and principles of design with a fun patterned frame. I love how framing enhances the spin art and grounds it as a finished piece, ready to hang.
Discuss complementary colors, contrast in line and shape, rhythm, and repetition!
Spin Art as a Center and TAB
Spin Art makes for a perfect center activity! The resulting paper can be easily be worked into a collage, become cover material for a handmade book, or the beginnings of a creative creature. My favorite part is how satisfying it is for students yet simple for me:
Easy setup and cleanup
Simple directions for independent exploration
Fast rotations- ideal for 4 people at a table during a 5-minute rotation
Instant results and a sense of accomplishment
Just make sure students write their name on the back before they start and know where to put their wet artwork! Lastly, learn from my mistakes! I now avoid leaving spin art paper for the next rotation within reach, so they don't attempt making multiples during their rotation, unless time allows.

Adaptive Spin Art
This is where this activity really shines! I first latched onto Spin Art while researching fine and gross motor skill-based exercises for students in exceptional need classrooms (SPED). Not only does this work fascinate my kiddos but the skill-building is incredibly engaging:
Pinching of the eyedropper is an ideal hand workout for grasping a pencil
Transferring of paint from the cup to the spinner encourages crossing the midline
Pushing/slamming the button (which I totally welcome!) allows for major energy release
Depending on a student's accommodations, you can expect to support by offering hand-over-hand assistance with the pinching of the eyedropper and the pressing of the spinner button to ensure it revolves fast enough to create the desired effect.
Many of my sweet students press their face against the top of the spinner to watch it work. Investigating the operation of a simple machine cements their buy-in. This is coming from a teacher who's had about 10 self-contained adaptive art groups, in the past two years. It's a hit- I promise you!
Occasionally, I'll have a student who is sensitive to the sound of another student slamming the button and we will have to support that student. Noise-cancelling headphones help when indicated. But when it's their turn?! Oh how they become entranced!
Final Thoughts
Spin art with a salad spinner is low-prep, budget-friendly, and endlessly adaptable. It engages every kind of learner, builds important developmental skills, and adds joy to the art room. Whether you use it as a center, a seasonal project, or an adaptive activity, this project deserves a spot in your teaching toolkit.
Comments